Anti Termite Measures
Termite control in buildings is very important as the damage likely to be caused by the termites is huge. Wood is one of the cellulosic materials which termites damage. Termites are also known to damage non-cellulosic substance in their search for food. Rubber, leather, plastic, neoprene as well as lead coating used for covering of underground cables are damaged by termites.
Anti Termite Measures
Termites constitute a separate order of insects called ‘Iseptora’ ( ises is ‘equal’ and pteron means ‘wing’ in Greek). Although, they are commonly called white ants, they are not related to ants. The front pair of wings of the ants’ are longer than their hind pair whereas in termites, both pairs are equal. There are over 2 300 species of termites of which about 220 are found in India. All these species are not considered to be serious pests.
According to their habits, termites can be divided into two well defined groups:
A: Subterranean or ground nesting termites which build nests in the soil and live in them
B: Non-subterranean or wood nesting termites which live in wood with no contact with soil.
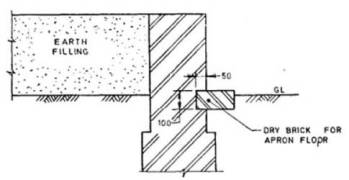
Anti Termite Construction Stage-1
Earth free from roots, dead leaves, or other organic matter shall be placed and compacted in successive horizontal layers of loose material not more than 200 mm thick. Dry brick shall be inserted at least 50 mm in brick masonry for providing apron floor alround the periphery.
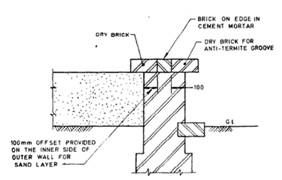
Anti Termite Construction Stage-2
Brick on edge masonry in cement mortar shall be laid on the plinth wall. Dry brick shall be placed on the inner side of plinth wall for getting anticipated offset space for coarse sand and on the other side for installing anti-termite masonry groove. In the case of intermediate walls, dry bricks are placed on either side of the brick on edge masonry for getting offset space for coarse sand layer.
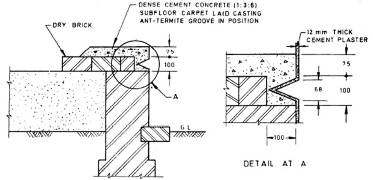
Anti Termite Construction Stage-3
The dry brick for the anti-termite groove shall be taken out and dense cement concrete 1 : 3 : 6 ( 1 cement : 3 sand : 6 coarse aggregate, by volume ) sub-floor carpet shall be laid casting the anti-termite groove in position. In case of internal partition walls, the cement concrete subfloor shall be laid on either side over the dry bricks to sufficient extent for getting staggered vertical joints over the joint of plinth wall and earth filling.
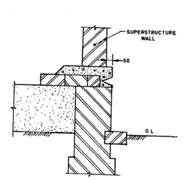
Anti Termite Construction Stage-4
Superstructure masonry shall be raised over the dense cement concrete sub-floor carpet and over-head jobs completed.
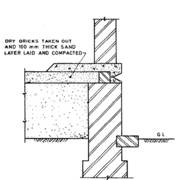
Anti Termite Construction Stage-5
The dry brick for coarse sand layer shall be removed and graded sand ( of size 3 to 5 mm ) layer at least 100 mm thick shall be compacted over the earth filling and underneath the partially laid dense cement concrete sub-floor carpet.
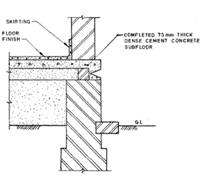
Anti Termite Construction Stage-6
Dense cement concrete ( 1 : 3 76 mix ) sub-floor at least 75 mm thick shall be laid over the sand filling. Necessary finish may be provided to the cement concrete sub-floor carpet.
Anti Termite Construction Stage-7
Dry brick provided for apron floor ( see 4.1.1) shall be taken out and 600 mm wide formation of earth in 1 : 30 slope shall be made. Over the formation, 75 mm thick lime concrete 1 : 3 : 6 ( 1 lime: 3 sand : G-coarse aggregate, by volume ) shall be laid.

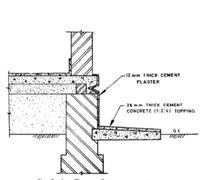
Anti Termite Construction Stage-8
Over the 75 mm thick lime concrete bed at least 25 mm thick cement concrete topping 1 : 2 : 4 ( 1 cement : 2 sand : 4 fine aggregate, by volume ) shall be laid and 12 mm thick cement plaster shall be applied on foundation and plinth.
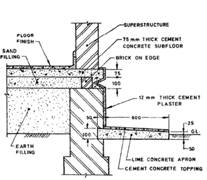
Anti Termite Construction Stage-9
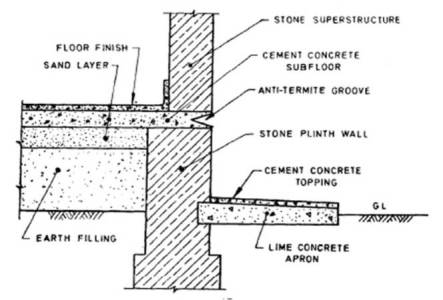
The final recommendations incorporating the constructional details given in all pervious slides is shown in.
Anti Termite Construction Stone Wall
The final recommendations incorporating the all the anti termite constructional details given in stone wall superstructure.
Installation Of Termite Shields
Termite shields may be installed round the periphery of a building where infestation of termite is high. Provision of metal shields takes care of external protection only.
For the metal shield to function effectively, it is essential that it is installed correctly and the shape of the shield shall be maintained properly which requires periodical inspection after installation.
At least 50 mm width of termite shield shall be properly embedded in the cement concrete sub-floor with 50 mm horizontal projection on the external side of the wall and further projection of 50 mm bent downwards at an angle of 45”. The 50 mm embedment of termite shield in concrete sub-floor facilitates its easy replacement whenever required .
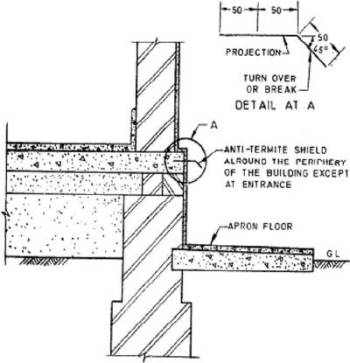
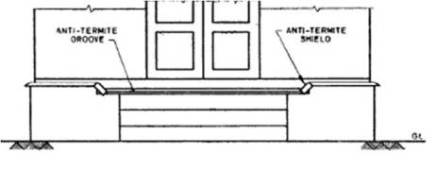
Termite Shields at Entrance
At entrances and doorways, where installation of termite shield is not practicable anti-termite masonry groove is installed Necessary construction arrangements shall be ‘made at the junction of termite shield and groove to ensure that entry of termite is prevented

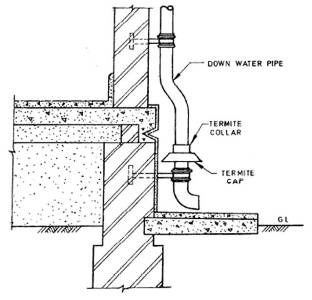
Installation of Termite Caps.
Termite caps shall be used in the case of basement with support where timber sections occur over them in the case of columns. The termite caps shall be kept at plinth level covering the whole of the section in the plinth below providing the necessary projection of 50 mm beyond the outer edge of the column on all sides and also the turnover of 50 mm width. In case of down-water pipes the termite cap shall be fitted on the pipe in the form of a ring. The projection and turn-over shall be the same as specified for termite shields in general. The bottom portion of down-water-pipe should be at least 200 mm away from wall.
Chemical Treatment of Soil.
Treating the soil beneath the building and around the foundations with a soil insecticide is a preventive measure. The purpose of the treatment is to create a chemical barrier between the ground from where termites come and woodwork or other cellulosic materials in the buildings. The following chemicals conforming to relevant Indian Standard in water emulsion are effective when applied uniformly over the area to be treated.
| Chemical | Chlorpyrifos 20 EC | Lindane 20 EC |
| Relevant Indian Standard | IS 8944 | IS 632 |
| Concentration by Weight,percent(active Ingredient) | 1.0 | 1.0 |
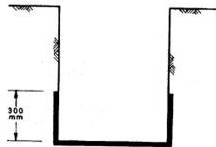
A: Treatment for Masonry Foundations
The bottom surface and the sides (up to a height of about 300 mm) of the excavation made from masonry foundations and basements shall be treated with the chemical at the rate of 5 lt/m2 surface area.
B: Treatment for Masonry Foundations.
After the masonry foundations and the retaining wall of the basements come up, the backfill in immediate contact with the foundation structure shall be treated at the rate of 7.5 l/m2 of the vertical surface of the sub-structure for each side. If water is used for ramming the earth fill, the chemical treatment shall be carried out after the ramming operation is done by rodding the earth at 150 mm centres close to parallel to the wall surface and spraying the chemical emulsion at the above dosage.
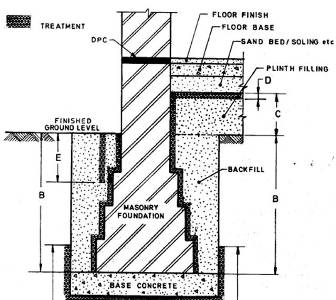
C: Treatment at Junction of the Wall and the Floor
Special care shall be taken to establish continuity of the vertical chemical barrier on inner wall surface from ground level (where it had stopped with the treatment described in 7.2.2) up to the level of the filled earth surface. To achieve this, a small channel 30 mm x 30 mm shall be made at all the junctions of wall and columns with the floor (before laying the sub-grade) the rod holes made in the channel up to the ground level 150 mm apart and the iron rod moved backward and forward to break up the earth and chemical emulsion poured along the wall at the rate of 7.5 l/m2 of vertical wall or column surface so as to soak the soil right to the bottom. The soil should be tamped back into place after the operation.
D: Treatment of Top Surface of Plinth Filling.
The top surface of the consolidated earth within plinth walls shall be treated with chemical emulsion at the rate of 5 l/m2 of the surface before the sand bed or sub-grade is laid. If the filled earth has been well rammed and the surface does not allow the emulsion to seep through, holes up to 50 to 75 mm deep at 150 mm centres both ways maybe made with 12 mm diameter mild steel rod on the surface to facilitate saturation of the soil with the chemical emulsion.
E: Treatment of Soil Along External Perimeter of Building
After the building is complete, the earth along the external perimeter of the building should be rodded at intervals of 150 mm and to a depth of 300 mm. The rods should be moved backward and forward parallel to the wall to break up the earth and chemical emulsion poured along the wall at the rate of 7.5 l/m2 of vertical surfaces. After the treatment, the earth should be tamped back into place. Should the earth outside the building be graded on completion of building, this treatment should be carried out on completion of such grading.
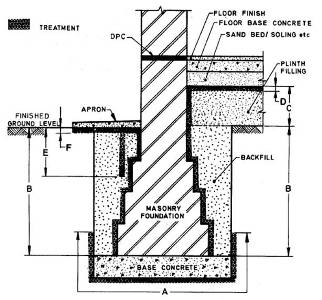
F: Treatment of Soil Under Apron Along External Perimeter of Building
Top surface of the consolidated earth over which the apron is to be laid shall be treated with chemical emulsion at the rate of 5 l/m2 of the surface before the apron is laid. If consolidated earth does not allow emulsion to seep through, holes up to 50 to 75 mm deep at 150 mm centres both ways may be made with 12 mm diameter mild steel rod on the surface to facilitate saturation of the soil with the chemical emulsion.
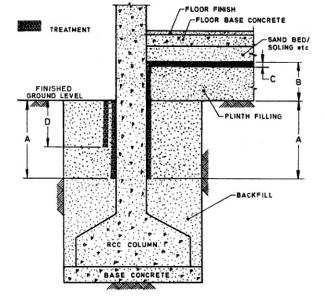
G: Treatment for RCC Foundations and Basement
In the case of RCC foundations, the concrete is dense being a 1:2:4 (cement: fine aggregates: coarse aggregates, by volume) mix or richer, the termites are unable to penetrate it, it is therefore, unnecessary to start the treatment from the bottom of excavations. The treatment shall start at a depth of 500 mm below the ground level except when such ground level is raised or lowered by filling or cutting after the foundations have been cast. In such cases, the depth of 500 mm shall be determined from the new soil level resulting from the filling or cutting mentioned above, and soil in immediate contact with the vertical surfaces of RCC foundations shall be treated at the rate of 7.5 I/SQM. The other details shall be as laid down in.
Information on this site is purely for education (students / users) purpose. The materials used and displayed on the Sites, including text, photographs, graphics, illustrations and artwork, video, music and sound, and names, logos, IS Codes, are copyrighted items of respective owners. They are provided here just for reference / information.
For your views and discussions Register in FDAchitects Forum …